Thursday, February 3, 2011

Crispy Baked Potatoes

I love baked potatoes.  Especially those that are rolled in olive oil and kosher salt before baking. Oh my goodness... so good.  The only problem is that they take an awfully long time to bake.  Well here is a recipe that gives you that same wonderful flavor and creaminess of a baked potato in a shorter amount of time and also has an awesome crispiness to the potatoes that regular bakers don't have.


Crispy Baked Potatoes
2 baking potatoes, like Idaho or russet
olive oil
kosher salt and freshly ground black pepper

Preheat over to 425 degrees. Scrub the potatoes clean and pat dry.  Cut in half lengthwise and rub with olive oil and liberally sprinkle with salt and pepper.  Place on a rimmed baking sheet and place in the oven for about 15 minutes.  With tongs flip the potatoes and sprinkle with a little bit more salt and pepper.  Return to the oven for about 10-15 minutes more.  Serve with a dollop of sour cream and garnish with fresh parsley or chives.


Wednesday, February 2, 2011

Basic Recipe's Everyone Should Know How to Do- Sauteed Boneless Chicken Breasts

Exciting, adventurous, new dishes are always a fun to make. It keeps life exciting in the kitchen and helps keep the weekday blahs at a minimum. But these dishes really are only great once you can master the basics. It's like the old saying goes- you need to learn to walk before you can run. I am going to post a series of some nice, basic recipes- that once you have these perfected you can basically make anything at all.


Today I am going to share a absolute necessity! Sauteed Chicken. As simple as chicken may seem, it is also the one meat that so many people are completely afraid to cook. People have this fear of under cooking it, and therefore end up cooking it to death- leaving it so dry and tough, you just may as well chew on leather. Yuck. Just like most meats, timing is everything. Watch the clock and watch the temperature of your pan. You don't want to burn the outside before the inside is cooked and you also don't want to steam your chicken at too low of a heat because this takes way too long and will dry out the meat.  If the pan is hot enough, a boneless skinless chicken breast should cook in exactly 4 minutes* a side.  *More of less depending on thickness.  It is a great idea to pound your chicken breast.  This will tenderize the meat and also ensure even cooking time.  If one side is super thick and the other thin, one half will start to dry out before the plump side cooks through.  To pound you chicken, use a meat tenderizer.  If you don't have one, a rolling pin or a heavy bottom pan would work.  place the chicken between two pieces of plastic wrap or waxed paper (to avoid splattering) and just hammer on the meat to flatten it.  Try and be careful not to tear the meat, you just want to flatten it out.  Tenderizing meats not only insures even cooking time but also reduces the amount of time you need to marinate your meats.

Ok so back to the chicken... after you have tenderized your chicken, you want to rinse and pat dry.  Trim it of any fat around the edges and sprinkle both side with salt and fresh ground black pepper.  On a plate, spread out your flour and coat the chicken on both sides, pressing to make the tenderloins (the thin strips of meat on the underside of the chicken breast) adhere. Gently shake off the excess flour; too much will just cause them to burn.

Preheat a heavy 10-12 inch skillet over medium-high heat.  Add to the pan 1 1/2 tablespoons unsalted butter and 1 1/2 tablespoons olive oil.  Swirl the butter and oil around until it smells awesome and is a nutty-brown color.  Place the chicken in the pan, tenderloin side down and saute for exactly 4 minutes- set a timer!  Do not let anything burn.  If it appears like it is too hot or beginning to burn, turn down the heat a bit.  Using tongs, turn your chicken and cook until the chicken feels firm to the touch, about 3-5 minutes more- don't be afraid to touch your meat!  Your fingers are a great judge of doneness.  A milky juice will also appear around the tenderloins.  If you are afraid, you can carefully make a small slice into the thickest part of the breast to see if the juices run clear.  but you really don't want to make a habit of this because when you cut into the meat you release juices that haven't had a chance to absorb back into the meat yet.  This is what keeps your chicken tender and moist.

And look at that- you are done!  A wonderfully juicy piece of chicken that is absolutely delicious on its own, but kicked up a notch with a nice sauce made in the pan drippings.

Serve with a side of potatoes and a fresh vegetable and you've got dinner!

Ingredients
4 boneless, skinless chicken breasts
1 1/2 Tablespoons unsalted butter
1 1/2 Tablespoons olive oil
1/4 cup flour
salt and freshly ground black pepper, to taste


Stay tuned, my recipes for Crunchy Baked Potatoes and Brussels Sprouts with Shallot-Browned Butter are on their way!

Tuesday, February 1, 2011

Huevos Rancheros


Huevos Rancheros stands for Ranch Style Eggs.  This is one of my most favorite meals of all time.  It is spicy, gooey and 100% satisfying.  It makes for a fun, non-traditional breakfast.  But I cook this for dinner all the time.  It is very fast meal, so you can easily make this at the end of a long day and have dinner on your plate in well under 20 minutes.

There are two ways you can prepare this dish.  You can cook a homemade salsa in your skillet, using fresh tomatoes, onions, jalapenos and cilantro- my favorite method.  But if you don't happen to have any of these ingredients onhand, but do have a jar of prepared salsa- use that!  I use this short-cut all the time.  especially in the months when the tomatoes in the grocery store look less then appetizing.  You really want juicy tomatoes.  So if they are too firm in the market or look too pink (you know what I mean), buy a good quality jar of salsa.

The whole basic concept of this recipe is you cook your salsa in a skillet (or heat up the jarred salsa) until simmering.  Then you very carefully slide an egg into holes you create in the salsa and poach them in the sauce until the tops become translucent, but still the yokes are runny.  Serve ontop of a warmed tortilla, top with a touch of cheese- and voila!  So easy, but really a crowd pleaser.


Huevos Rancheros 
serves two

4 eggs
2 tortillas (I prefer flour, but you could very well use corn)
freshly grated cheese (I used a cheddar and a montery jack)
1 Tbsp olive oil

For Ranchero Sauce (if using jarred salsa, skip these ingredients.)
3 large tomatoes, chopped. Do not drain. You want the juice and seeds. or or 1 - 15oz. Can Whole Peeled Tomatoes, undrained
1 yellow onion, chopped into chunks
1 jalapeno, seeds and ribs removed (you can keep the seeds and ribs if you want more of a kick. This is where the majority of the heat is located), diced
2 cloves of garlic, chopped
1/2 cup cilanto, coarsely chopped (parsely may be substitued if you don't care for cilantro)
2 Tbsp olive oil
salt and fresh ground pepper, to taste

Move oven rack into the middle position and preheat oven to 200°F. Place 2 ovenproof plates on rack to warm.

Heat 1 tablespoon oil in a 10-inch heavy skillet over moderate heat until hot but not smoking. One at a time, heat tortillas for about 30 seconds a side, until just starting to bubble. Flip and repeat. Once lightly warmed on both sides transfer to a plate in the oven to keep warm. Repeat with remaining tortilla. Loosely cover both plates so the tortillas don't dry out.

For the Ranchero Sauce: (if using jarred salsa skip down to the next step)
Over medium heat, add the olive oil to the same skillet you browned your tortillas in.  Add the onions, garlic and jalapenos and sauté until the onions become translucent.  Being careful not to burn your garlic. Add the tomatoes to the pan and simmer until the sauce reduces a bit and begins to thicken, about 10 minutes.   If your tomatoes don't seem juicy enough, add a little water at a time until you get a nice, salsa type consistency.  Once thickened add the cilantro, salt and pepper and combine.

If using jarred salsa, pour the salsa into your skillet and simmer over medium heat until it reduces a bit and begins to thicken.

Now is the fun part!  We are going to "poach" the eggs inside the salsa.  One at a time, make a hole inside the salsa about the size of a half dollar and very carefully break your egg into the hole. Repeat with remaining eggs.


Lightly pepper your eggs and let simmer in the sauce until the white become opaque and the yokes start to glaze over.  If your yokes are taking a little too long to set up, cover briefly, checking on them often.  You totally want a runny yoke for this recipe.  It makes the dish!


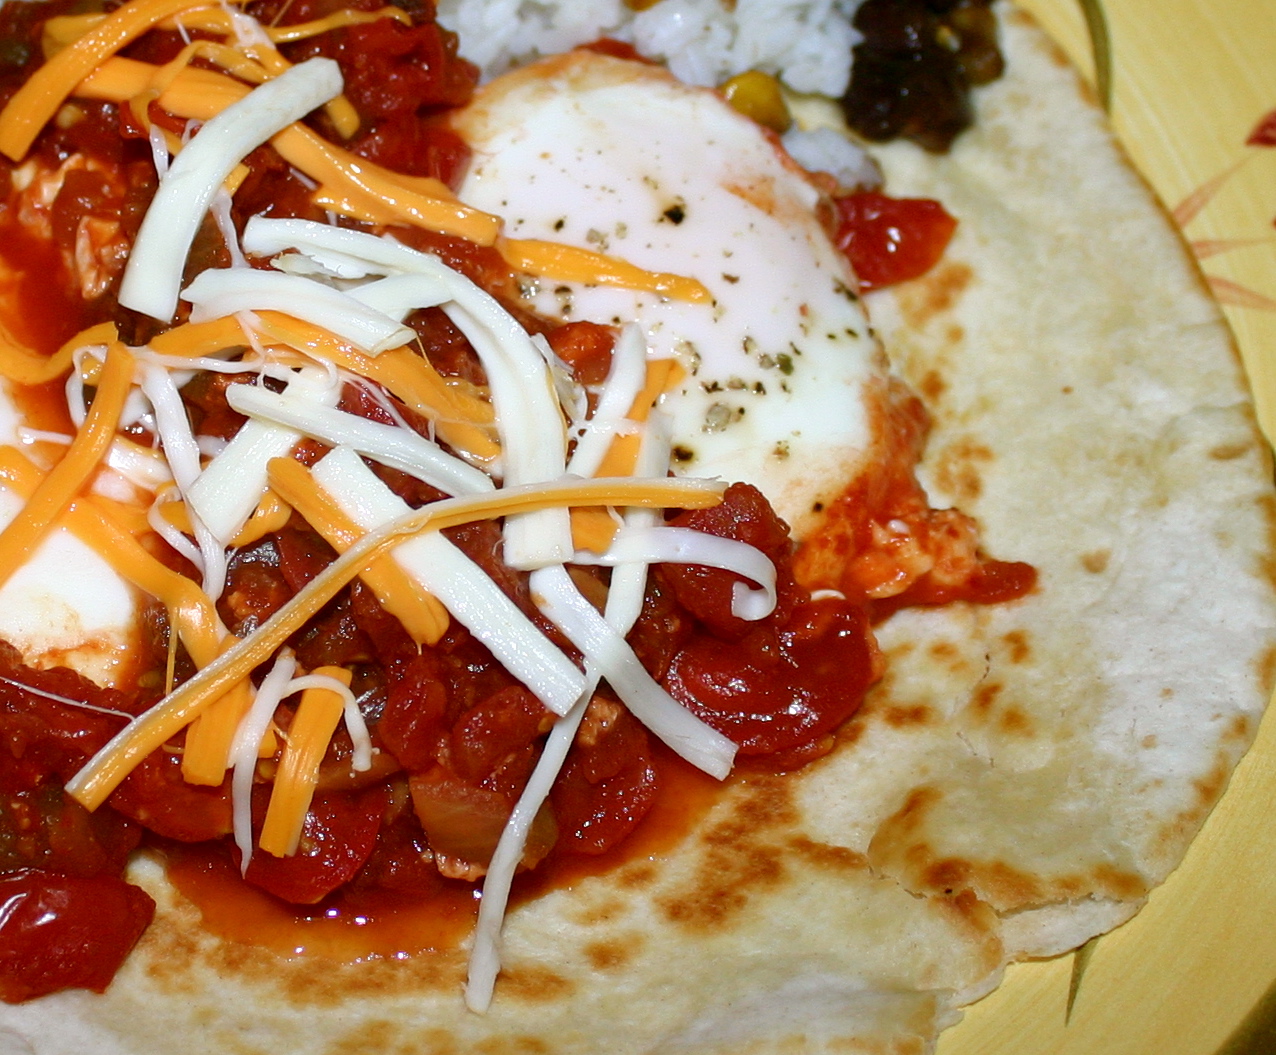
Once eggs are set up, remove your plates from the oven and discard foil.  Top each tortilla with a few spoonfulls of your cooked salsa.  Carefully using a large spoon, place two eggs per plate on top of the salsa tortillas.  Spoon a bit more salsa onto the eggs and sprinkle with grated cheese. Serve with Classic Black Beans or Black Beans and Corn on Rice (shown).  Enjoy!

LinkWithin

Related Posts with Thumbnails