Friday, January 27, 2012

Traditional Apple Crisp


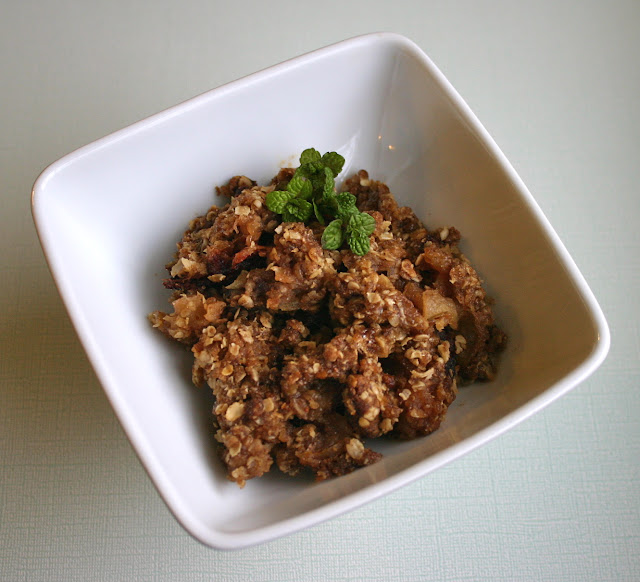
For dessert on Girls Night, Bonnie made a classic Apple Crisp. Oh how I love fruit crisps- probably one of my most favorite desserts. It is simple to throw together, but the smell it sends through the house while baking is soooo comforting and wonderful.  I am usually a If It Isn't Chocolate, I Don't Want It kind of girl when it comes to dessert.  But NOT when apples are involved.  They are my absolute favorite dessert fruit.  The crisp sweetness when raw turns into a lovely warm, caramelized flavor that is like no other.  Pair it with a little cinnamon and sugar and even better throw in rollled oats and of course butter and you've got me for sure! Delicious, homey and one dessert everyone needs to learn how to do.

with whip or without, either way this dessert is a win!

Traditional Apple Crisp
recipe courtesy Family Fun

6 apples (or 6 cups of apple slices)
1 1/2 cups rolled oats
3/4 cup brown sugar
1/4 cup all-purpose flour
1 teaspoon cinnamon
1/4 teaspoon nutmeg
1/4 teaspoon salt
1/2 cup butter (1 stick), softened
Whipped cream or ice cream (optional for serving)

To peel an apple safely, your child should hold the fruit in one hand, grip a vegetable peeler in the other, and push the peeler away from himself.

Heat oven to 375 degrees and lightly butter an 8 or 9-inch-square baking pan. Peel, core, and slice the apples and arrange them evenly in the prepared pan.

Place the oats, brown sugar, flour, spices, and salt in a sealable plastic bag, close, and shake until combined. Cut the softened butter into 1-inch pieces and add to the oat mixture. Close the bag again and knead or squeeze until the mixture holds together. Instead of using a bowl to mix the crumb topping, use a sealable plastic bag. This will cut back on dirty dishes and let young bakers--even preschoolers--lend a hand.

Open the bag and crumble the topping evenly over the apples. Bake the apple crisp for 40 to 45 minutes or until the topping is golden brown and the juices begin to bubble around the edges.

Cool slightly, then serve with whipped cream or ice cream.


My favorite parts: the crispy, gooey edge bits 
and when the whipped cream melts into the warm crisp just right


Do you ever read that little box on my sidebar over there -->
Labeled "Daily Inspirations.  Quotes Amie Likes"?
It is a fun box that rotates a new famous quote with each push of the refresh button.

Well I love looking at it and being inspired throughout my day.  Just as I was writing this entry I saw a quote that really struck to me for it was so fitting to my beautiful friends Bonnie and Dawn.....

"Each friend represents a world in us, a world possibly not born until they arrive, and it is only by this meeting that a new world is born." —Anaïs Nin

I love you my sweet friends.
Thursday, January 26, 2012

Souperburgers


The theme for this month's girl's night with my girlfriends Bonnie and Dawn was Soup and Sandwiches (and always a dessert of course!).  The way that our meals always go is we pick a theme and then each girl gets to pick whatever they want to make for their portion of the meal.  I always wanted to make French Onion Soup, so I volunteered for that part.  Dawn picked sandwiches and Bonnie chose to make an Apple Crisp for dessert for a change.

I am posting Dawn's recipe first this time.  (The other two recipes will be posted this week.)  It tasted great and was pretty simple.  The original recipe called for ground beef, but just before cooking we realized that pork was purchased on accident.  Well it definitely didn't taste like an accident.  Actually I think I preferred the added flavor of the pork in place of the usual ground beef or turkey.  But use what you like, they will all work nicely.

"Here is the recipe for my sandwiches. They are called Souperburgers and I think they're just a little twist on Sloppy Joe's." --Dawn


Souperburgers
original recipe from recipe.com

1 pound ground meat (turkey, beef or pork)
1 medium onion, chopped
1 (10.75 ounce) can Condensed Tomato Soup
1 tablespoon prepared mustard
1/8 teaspoon ground black pepper
6 sandwich rolls

Cook the meat and onion in a 10-inch skillet over medium-high heat until it is well browned, stirring often. Pour off any fat.

Stir the soup, mustard and black pepper in the skillet and cook until the mixture is hot and bubbling. Divide the meat mixture among the rolls.


(I'm gonna admit I didn't catch the play on words in the name of the recipe (the Souper part) until I got home and started writing the recipe.  But it uses condensed tomato SOUP.  ding ding ding!!  I think tomato paste and a bit of tomato sauce would work fine in place of the canned soup.  If you go this route be sure to salt your mixture a bit- there is no salt in this recipe since there is salt in the soup.  But the soup sure made it easy!)

Tuesday, January 10, 2012

Beef Roast with Tomato Ragout (Slow Cooker)


I am always on a hunt for a good slow cooker pot roast.  You have all been asking me for more slow cooker recipes.  This one works for both of those requirements!  I usually make up more of a beefy, mushroom type sauce, but to change things up a bit this one is a tomato and red onion sauce.  Change is good, right?!  I happened to have all of the ingredients in my pantry, making this recipe quite economical as well.

Everyone loved the flavors and richness the sauce brings to the meat.  We all started out with a slight drizzle of sauce over the meat, and then added more and then added even more!  It was so yummy!  I loved having one big bite of meat, potato and peas all in one.  Hearty, slow cooked and complete comfort food.

Beef Roast with Tomato Ragout
recipe from Sandra Lee Semi-Homemade Slow Cooker Recipes 2

1 large red onion, peeled and thinly sliced
1 can (28 ounce) whole peeled tomatoes with basil, drained and broken into pieces
3 lbs beef rump roast, rinsed and patted dry
1 teaspoon garlic salt
1 teaspoon ground black pepper
1 can condensed tomato soup (if you didn't want to use caned soup you could substitute one can of tomato sauce and 2 tablespoons tomato paste)
2 tablespoons balsamic vinegar
1 envelope onion soup mix (or 5 tablespoons of your own homemade batch found here)
1 tablespoon Italian seasoning (or a mix of oregano, basil, sage, parsley)
1 garlic clove, thinly sliced

In a 5 quart slow cooker, combine onion and tomatoes.  season rump roast with garlic salt and pepper.  Place roast in slow cooker on top of vegetables, fat side up.

In a small bowl, stir together remaining ingredients thoroughly and pour over rump roast.  Cover and cook on LOW setting for 8-10 hours (or on High for 4-5).

Strain and defat cooking liquid.  Serve as a sauce on the side.

I made a quick rue on the stove and added in the sauce to thicken up and make a gravy. It was delicious!


Monday, January 9, 2012

Dry Onion Soup Mix


Ever in the middle of making a slow cooker pot roast or want to make a yummy chip dip and don't happen to have one of those envelopes of dry onion soup mix?  Well look no further!  Here is that wonderful mix that you can do yourself and keep on hand for those last minute recipes.  Just make it up now, seal up in an airtight container and you are ready to go.  I love mason jars for this sort of thing.  This recipe makes up well more then one envelope worth.  Be sure you shake the jar well before each use.

Onion Soup Mix
recipe courtesy Food.com

3/4 cup instant minced onion
1/3 cup beef bouillon powder
4 teaspoons onion powder
1/4 teaspoon crushed celery seed
1/4 teaspoon sugar

Combine all ingredients and store in an airtight container.

**About 5 tablespoons of mix are equal to 1 1¼-ounce package.
To make onion dip: Mix 5 tablespoons with one pint of sour cream.

Saturday, January 7, 2012

Whole Wheat Flour Tortillas


This was one of those things that every single time we had soft tacos or flour enchiladas I would think to myself "Hey, I bet I could make these".  Well last night I finally did!  And seriously, listen to me- never go out and buy them again!  This recipe couldn't be any more simple.  It is made with whole wheat which I love and no lard like in so many other recipes, making them much healthier than most store-bought versions.  The taste is light and nicely flavorful, and we all hands-down agreed that we never, ever should eat the store bought kind again.

We had a few left over so I wrapped them in foil and put them in a large re-sealable bag in the fridge.  I was a little nervous that the moisture of the fridge would turn them gummy, but the next day they were even more amazing- if you can believe that!  I tried both reheating them in the microwave sandwiched between damp paper towels and than also wrapped in foil and placed in a warm (200 degree) oven for 5 minutes.  Both ways provided delicious, pliable, rollable flour tortillas!  So not only are they great made to order, but also made ahead of time and just reheated for company the next day.

A friend told me that she heard flour tortillas were very difficult to roll out into circles.  I really didn't have much trouble.  They aren't prefect circles as you can see.  But close enough!  Honestly, I don't really like my homemade goods to look too "perfect".  I like the imperfections that tell you they were made with love at home instead of mass-produced from a store.  And I am sure that practice makes "almost" perfect, and I know that I will be making these many, many, many more times in the future.


Whole Wheat Flour Tortillas
recipe courtesy The Everything Bread Cookbook

yields 6-8 tortillas

1 cup whole wheat flour
1 cup all purpose flour
1/2 teaspoon salt
2 Tablespoons vegetable oil
1/2-3/4 cup cold water

In a large bowl, combine flours and salt.  Stir in oil, and enough water to hold dough together.  Knead until smooth, about 2-3 minutes, then let it rest for 5 minutes.

Turn dough out onto a floured work surface.  pinch off golf-ball-sized pieces of dough and roll into balls.  With floured fingers, flatten into thin disks.  Using a rolling pin, roll out disks no more than 1/4" thick.  If the dough becomes elastic and springs out of shape, allow to rest for 5 minutes, then roll again as necessary.

Preheat griddle over heat.  Cook until lightly goldne but still pliable, about 1-2 minutes per side.  Serve warm.

Don't they look so yummy?!  Why don't you go and make some tonight?

Friday, January 6, 2012

Apple Cream Cheese Quick Bread


Do you love cheese danishes as much as we do?!  If so, then you will LOVE this recipe! It is a quick bread (think simple and easy!) But has all the amazing flavors of a cheese danish, minus the extra work involved. And with the addition of grated apples you get the tangy sweetness of the fruit as well.

I made a loaf last night and already over half of our bread is gone! Jackson can't keep his little hands out of it. Last night while I was slicing, he kept sneaking little bites and this morning he says to me "Mommy, can I have a piece of your bread now and another piece at breakfast? I love it!" Now, mind you this was just at 7:30am while I was in the middle of scrambling his egg for breakfast.  I guess it is a winner! We even bought more apples today to make more this weekend. Yeah, it's that good.

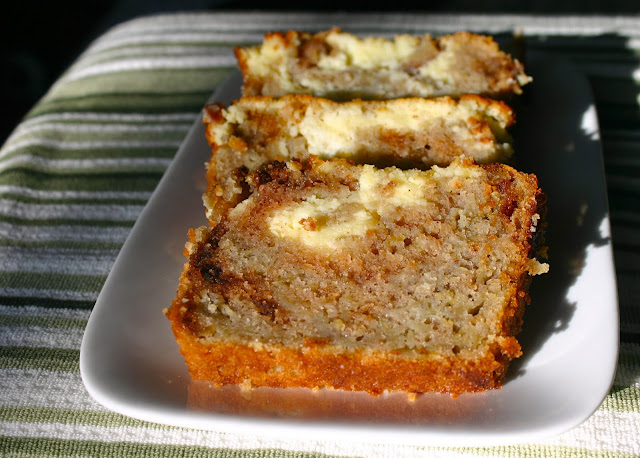
Just be sure to grease and flour your pans really, really well. As you will see in the pictures, parts of my crust stuck to the pan.  Jackson told me that it was ok, he would just eat those good bitzky bites for me that stuck. Good thing I don't have finicky eaters in this house :)  I apologize for the not so beautiful pictures, but you get the point.  We were all too much in a hurry to eat!


Apple Cream Cheese Bread
recipe courtesy of Tomato Kumato

for the apple cake
2 apples
1/2 cup vegetable oil
1 cup sugar
2 eggs
1 tsp. vanilla
1 1/3 cup flour
1 tsp. baking soda
1/2 tsp. salt
1 tsp. cinnamon
1 pinch nutmeg

for the cream cheese swirled topping
6 oz. cream cheese
1/2 cup sugar
1 egg

Preheat oven to 350 degrees F.

Grate the apples (skin and all) into a large mixing bowl. Add the oil, cup of sugar, eggs and vanilla and mix well to combine. Without mixing, add the flour, baking soda, salt, cinnamon and nutmeg. Carefully fold the dry ingredients into the wet, and pour into the prepared loaf pan.

Combine the cream cheese, sugar and egg with a fork. Pour over the top of the batter, and use a knife to swirl the two layers together.

Bake loosely covered with foil for 30 minutes. Then remove the foil and continue to bake an additional 15-20 minutes (mine took at least 20 additional minutes, and I have an oven that runs hot), until a toothpick inserted into the cake comes out clean with a few crumbs attached. Allow to cool fully before slicing.  This is very important.  I know it will be tempting to cut into it right away, but the bread needs to set up some, otherwise it will fall apart if sliced too soon.


Here is close-up of all that wonderful swirly goodness.  Caramelized sugar, cinnamon, sweetened cream cheese, bits of apple......

Wednesday, January 4, 2012

Honey White Bread


This easy bread is the perfect starter bread for all of you that are interested in bread-baking but are a little nervous of where to begin.  It comes together pretty quickly and has just the right amount of hands on baking that makes you feel proud of yourself for serving your family home-baked bread.  And let me tell you about this flavor.  Delicately sweet, with the hint of honey throughout with a slightly sticky honey-laden crust, giving even the biggest crust-hater something to love. It is my favorite part!  It has a light crumb and is very easy to slice making it a perfect sandwich bread.  I love the way the sweetness of the honey pairs with a ham or turkey sandwich- yum!  But my favorite way to eat it- lightly toasted and slathered with real, honest to goodness butter.  Perfection.


Honey White Bread
recipe from The Everything Bread Cookbook

yields 1 loaf

1 1/4 cups warm milk
3 tablespoons unsalted butter, room temperature
5 tablespoons honey
1 3/4 teaspoons active dry yeast (1 package)
3 cups all purpose flour
3/4 teaspoon kosher salt
1 teaspoon warm water

In a large bowl, combine milk, butter, 1 tablespoon honey, and yeast.  Stir to combine and let stand until foamy, about 10 minutes.

Add another 3 tablespoons honey and 1 cup of flour.  Stir to combine.  Add salt and enough remaining flour to create a firm dough.  Turn out onto a floured surface and knead 8-10 minutes.  You want the dough to be smooth and bounce back when pressed.  Lightly oil bowl with 1 tablespoon canola oil and return dough to oiled bowl.  Dust with flour, and cover loosely with plastic wrap or a damp kitchen towl (not terry cloth).  Rise at room temperature until doubled in volume, about 1 hour.

Coat a 9"x5" loaf pan with butter (don't forget the rim!) and line the bottom and short sides with a strip of parchment paper.  The honey you will brush on the bread before baking may cause the bread to stick to the pan.  This parchment will make it easy to remove.

Turn the dough onto a floured surface and shape into an oblong loaf.  Fold each end under the loaf, creating a rectangle and place into prepared pan.  Set aside to proof for 30 minutes.  Preheat oven to 350 degrees F.

Combine the remaining tablespoon of honey with a teaspoon of warm water, and brush gently over the surface of the risen dough.  Bake until golden brown and hollow  sounding when tapped, about 30-40 minutes.  Cool 10 minutes in pan, then turn out onto a cooling rack to finish cooling completely.


LinkWithin

Related Posts with Thumbnails