Showing posts with label Snacks. Show all posts

Tuesday, October 14, 2014

Raspberry Almond Brown Sugar Muffins


Wow, this pregnancy was a rough one for me in regards to wanting to do anything in the kitchen.  Just the mere thought of doing any sort of cooking or baking made my stomach turn.  I would do it because well, my family had to eat.  But it wasn't the wonderful, enjoyable hobby that I have had my whole life.  And unfortunately for that my blog posts suffered as well.  I am sorry and hope that you will all welcome me back with open arms! 
 
Now that our sweet Aaron is here, my aversion to all things "kitchen" are finally gone!  Halleluiah!  Last week as a part of International Babywearing Week we went to Rosby's Berry Farm and picked the most beautiful raspberry's!  
 
 
The harvest was bountiful and the berries sugary sweet.  I picked three quarts of them!   So today I celebrate with Raspberry Almond Brown Sugar Muffins.   These muffins are so amazing.  Seriously, they have the best of everything- sweet-tart raspberries and the crunch of the almonds and brown sugar topping make for the most perfect muffin. Being a nursing mom made it totally acceptable to have two this morning right?! 


Raspberry Almond Brown Sugar Muffins

2 cups all-purpose flour
1 teaspoon baking powder
1 teaspoon baking soda
1/4 cup shaved almonds
1/4 teaspoon salt
1 large egg
1 cup packed light-brown sugar
1/2 cup butter or margarine, melted
1 cup milk
2 teaspoons vanilla extract
1 cup raspberries (fresh or frozen)

Position the rack in the center of the oven and preheat to 400 degrees F. Lightly grease or line with paper baking cups (makes 12-18 muffins).

In a large bowl, blend together the flour, baking powder, baking soda, almonds, and salt.  In a medium bowl, beat the egg and brown sugar together until thick.  Beat in the butter, milk and vanilla extract.  Combine the two mixtures, blending until the dry ingredients are just moistened.  Gently stir in raspberries. 

Spoon the batter into the prepared muffin cups, filling each 3/4 full. Sprinkle the Streusel Topping (recipe follows) over the tops of the muffins.  Bake for 15-20 minutes, or until a cake tester or wooden toothpick come out clean.  Cool in the pan on a wire rack for 5-7 minutes.  Serve warm, or transfer to the rack to cool completely. 

For the Streusel Topping
1/2 cup all-purpose flour
1/4 cup brown sugar, packed
1/2 stick unsalted butter
1/2 teaspoon cinnamon

Combine all of the ingredients in a food processor and pulse until crumbly.  Alternately you can mash the ingredients with a fork.  Sprinkle over muffins immediately before baking.


Streusel Topping recipe courtesy about.com 

Monday, November 4, 2013

Cheesy Quinoa Bites

So it isn't a huge secret that I am not all that crazy about quinoa.  I want to like it, I really do!  It is so crazy good for you, it is supposed to aid in migraine health, and your body burns it as fast as you eat it.  But for the most part, it just isn't one of my favorite things.  That is until I discovered these guys!  A blog I love,  So Very Blessed, created these little gems and oh man are they delicious!! They are crispy on the outside, creamy on the inside and JAMPACKED with flavor! What I really love about this recipe, is how customizable it is.  You can switch around the ingredients for totally different flavors- add pepperoni and mozzarella cheese and now you have quinoa pizza bites, use ham, diced chicken and Swiss and voila! you have Cordon Bleu bites.  A bit of corn, black beans, chilies and cilantro and now they are Southwestern!  These cheesy ones I feel are the "base recipe", and from there the sky's the limit!   Be sure you check out So Very Blessed to see all the many flavor combinations she has come up with!  I've made each and every one and we LOVE them all!  The kids can't get enough of them either, making it even better.  They make an awesome snack, appetizer or side dish. I've even served them alongside a salad for a satisfying dinner.  No matter how you serve them, they will get gobbled up as fast as lightening!

I normally make the quinoa bites in my mini muffin pan, but this last time, I had extra mixture left over so I made a few patties in my muffin-top pan and they were fantastic! They would make a great "burger".  In these pictures I had a used a quinoa/brown rice blend because that was what the market happened to have at the time, and they were just as yummy. 


Cheesy Quinoa Bites
Recipe courtesy So Very Blessed

Makes: ~ 28 bites

Ingredients
2 cups cooked quinoa (I cook my quinoa in low sodium chicken broth)
2 large eggs
1 cup shredded carrot
2 stalks green onion, diced
2 cloves garlic, minced
1/4 cup chopped fresh cilantro
1/2 cup grated Parmesan cheese
2 Tbs all-purpose flour
1/2 tsp seasoning salt
1/4 tsp freshly ground pepper

Instructions
1.Preheat oven to 350 degrees.
2.Mix together quinoa, carrot, egg, green onion, garlic, cilantro, cheese, flour, salt and pepper.
3.Distribute mixture into a (well!) greased mini muffin tin, filling each cup to the top (1 heaping Tbs each).
4.Bake for 15-20 minutes.


We are big dippers in our house- the more sauces the better! Ha!  Our favorites are honey mustard dressing (pictured), BBQ sauce, frank's hot sauce, ranch/blue cheese dressing and for the pizza bites, spaghetti sauce of course!

Tuesday, August 27, 2013

Cinnamon-and-Raisin Muffins


Hello friends!  Goodness it feels good to be back and writing.  I decided to take the summer off from blogging to spend some much needed quality time with my family.  But now with my oldest back in school and only one little guy at home with me now, I have been so antsy to get back in the swing of things.  Breaks sure can be nice, gives the perfect recharge to the soul!  And now I have a head FULL of recipes I cant wait to share with you all! 

When Jackson gets home from school he is absolutely famished. A full day of school is hard work!! Baking gives me wonderful quality time with Little O and I love having special treats at home for when Jackson gets off the school bus.  He is going to be thrilled to see one waiting for him on the kitchen table this afternoon!!


Cinnamon-and-Raisin Muffins
recipe slightly adapted from 1001 Muffins by Gregg R. Gillespie

makes 10 muffins

1 1/2 cups All-Purpose flour
2 teaspoons baking powder
1 1/2 teaspoons ground cinnamon
1/2 cup raisins
1/4 teaspoon salt
1/2 cup packed brown sugar
1 large egg
1/4 cup butter, melted
1/2 cup milk

Position the rack in the center of the oven and preheat to 375 degrees F.  Lightly grease or line with paper baking cups ten 2 3/4-inch muffin cups.

In a large bowl, blend together the flour, baking powder, cinnamon, raisins, and salt.  In a medium bowl, beat the sugar, egg, butter, and milk until smooth.  Combine the two mixtures, blending until the dry ingredients are just moistened. 

Spoon the batter into the prepared muffin cups, filling each about three-quarters full.  Bake for 15-20 minutes, or until a cake tester or wooden toothpick inserted into the center of a muffin comes out clean.  Cool in the pan on a wire rack for 5-7 minutes.  Serve warm, or invert onto the rack to cool completely. 

Delicious slathered with butter and a bit of jam!


My taste tester approves!  Owen gobbled his muffin up in no time and kept telling me how yummy they were.  Big hit!  He's pretty stinking cute too, huh?  :)

Tuesday, October 23, 2012

Fall Harvest Recipe Round-Up!

Are you on a hunt for some wonderful Autumn treats for this Hauntingly Fun Halloween Weekend?!  I have assembled for you some of my most favorites, that will definitely be a hit at any party- and especially at your own dinner table!


Roasted Pumpkin Seeds
Both a Savory and a Sweet Version!


Pumpkin Favorites
From Left to Right, Top to Bottom:
Kolokithopita- Savory Greek Pumpkin Pie
Low Carb Spiced Pumpkin Bread
Yum Yum Brownie Muffins
Caramelized Onion Pumpkin and Ricotta Tortellini's with a Walnut and Sage Brown Butter Sauce


Apple Treats 
From Left to Right, Top to Bottom:
Apple Cream Cheese Quick Bread
Apple Dapple Cake
Traditional Apple Crisp
Apple Muffins with Cinnamon Sugar


Owl and Bat Cupcakes
And just incase you are looking for some fun ways to decorate your cupcakes for the Halloween Party, these are always a huge party hit!

Monday, July 23, 2012

Blueberry Quick Bread


This weekend my sister and I gathered the troops and headed up to Vermilion, Ohio to do some blueberry picking at Baumhart Berry Farm.   Bonnie had been here once before and raved about it, so this was my first time.  What a treasure to find!  The aisles are huge, easily accommodating our two large strollers, the bushes are tall enough that you aren't bending over giving yourself a backache and most importantly, the berries are HUGE and sinfully sugar sweet!!  I couldn't get over how easy it was to pick them, just grazing your hands over the plump fruits would drop them into your bucket.  The kids never tired of the picking and our buckets soon became full.  It was a fun afternoon, and even after all our snacking we still came home with more blueberries then one knows what to do with.  Don't worry, your tummies will know exactly what to do with them!

Let me help you with this lovely Blueberry Quick Bread.  It is overflowing with blueberries in ever single bite. The the bread itself has just the right sweetness and tastes heavenly with some soft butter smeared all over it. Try it with a slice of shaved ham on top.  Super yummy!


Blueberry Quick Bread
recipe courtesy allrecipes

5 cups all-purpose flour
1 1/2 cups sugar
2 tablespoons baking powder
1 teaspoon salt
3/4 cup cold butter or margarine
1 1/2 cups chopped walnuts (optional)
4 eggs
2 cups cold milk
2 teaspoons vanilla extract
3 cups fresh or frozen blueberries
Directions

In a large bowl, combine flour, sugar, baking powder and salt. Cut in butter until mixture resembles coarse crumbs. Stir in walnuts.

In a small bowl, beat eggs, milk and vanilla; stir into dry ingredients just until moistened. Gently fold in blueberries.

Pour into two 9-in. x 5-in. x 3-in. loaf pans. Bake at 350 degrees F for 65-75 minutes or until bread tests done. Cool in pan 10 minutes before removing to a wire rack.


This recipe is featured on This and That and  http://www.foodiefriendsfriday.com Linky Party

Tuesday, March 6, 2012

No Bake Cafeteria Peanut Butter and Chocolate Bars

If you haven't already done so, don't forget to please click on the link and give me a vote in Cleveland Magazine's Nothing But Net 32 Most Entertaining Blogs contest! Thank you!


You remember these don't you?!  They were the best part of school lunch, and in my school cafeteria we could get two of these guys for something like $.40!  Such a steal.  And no one would walk out of the lunch line without one of these guys on their tray!

For those of you unfortunate souls who grew up with out these delicious treats, think peanut butter cups, but more flakey and of course more peanut butter.  I remember always trying to get the chocolate top off in one big piece.  Ahhhhh memories.  Thank you Southern Plate for bringing this recipe back into my life!  So fun and such a crowd pleaser!  One recipe makes a full 9x13 pan, so you will have plenty to share and reminisce over. Trust me, you will have a lot of happy people surrounding you when you bring these treats over for that playdate (mommies and daddies as well as the kiddos!)


No Bake Cafeteria Peanut Butter and Chocolate Bars
recipe courtesy Southern Plate

1/2 cup butter (or margarine, whatever you have)
1/2 cup packed brown sugar (light or dark, again whatever you have)
1 teaspoon vanilla extract
2 cups peanut butter
2- 1/2 cups confectioners sugar
2 cups semisweet chocolate chips

Place all ingredients except the chocolate chips in a large microwave safe bowl. Microwave until butter and peanut butter are melted, one to two minutes (time will vary by microwave).

Remove from microwave and use a large spoon to stir all of the ingredients together until they form a ball of dough that leaves the side of the bowl. Pat into a 9x13 pan.

Pour chocolate chips into another microwave safe bowl and microwave at 30 second intervals, stirring after each, until completely melted. Spoon over top of peanut butter mixture and spread evenly.

Allow to cool completely at room temperature until chocolate hardens again or place in the refrigerator for faster hardening. Cut into squares and serve to some awfully happy people!


I linked up my recipe at Sweets for a Saturday!

Thursday, February 23, 2012

Butter Twist Cookies


These are a perfect cookie to bake when you want to throw something together really quick, you only have "the basics" in your pantry, but yet of course you want it to be simple, pretty and most importantly, delicious. These Butter Twist cookies by Martha Stewart are a winner for sure.  They are crisp and crunchy, making them the best kind of cookie for dunking, if you are into that sort of thing.  Which we all are in my family; coffee, an ice cold glass of milk, hot tea... almost no beverage goes undunked!  Yum!  They have a lightly sweet flavor, and a wonderful feel in your mouth from the flaky butter taste to the crispness of each bite.  These will be bookmarked as a do again, a perfect playdate cookies, lovely for tea parties and just great with a nice cozy mug of hot chocolate at the end of a long day.


Butter Twists
recipe courtesy Martha Stewart's Cookies

1/2 cup (one stick) unsalted butter, room temperature
1/2 cup sugar
1 teaspoon vanilla extract
1 large egg white
1 1/2 cups plus 2 Tablespoons all-purpose flour
1/2 teaspoon coarse salt

Preheat oven to 350 degrees F.

Put butter and sugar in the bowl of and electric mixer fitted with the paddle attachment; mix on medium speed until creamy.  Mix in vanilla and egg white.  Reduce speed to low.  Add flour and salt; mix until combined.

Roll dough into 3/4 inch balls. Roll each ball into a 6-inch log. Bend log in half, then twist.  Space 1 inch apart on baking aheets lined with parchment paper.

Bake, rotating halfway through, until cookies just begin to turn golden, 13-15 minutes.  Let cool on parchment on wire racks.  Cookies can be stored in airtight containers at room temperature.

*I added sprinkles to make them a little festive for a tea party the were baked for.  But the sprinkles are not necessary- just fun.  

Thursday, February 9, 2012

Oven Roasted Bananas- Traditional and also with Cinnamon and Chocolate

Or how to impress your kids and make your husband fall in love with you all over again.  This recipe is so dang easy your children can do it almost entirely on their own (except for needing a smidge of help with the hot oven).  It also works as a great summertime campfire trick.  They are wonderful plain, in their beautiful perfect banana state.  Or my personal favorite, sprinkled with cinnamon, stuffed with chocolate chips and dotted with butter...mmmmmmmm.

These make a lovely dessert, it would even empress guests at a dinner party.  But it also works perfectly for a breakfast with a dollop of yogurt, or to curb that mid day sweet tooth.  It turns a plain banana into something truly special.  It tastes so much like the famous dessert Banana's Foster, but it isn't!  A simple banana with nothing else tastes like it is so much more.  If you've never tried this recipe before you will be amazed on the lovely flavors it changes into.


Oven Roasted Bananas

Traditional Oven Roasted Banana
1 banana per person (and this is absolutely all you need if you want to go the plain route, which trust me, tastes anything but "plain")

preheat oven to 400 degrees F.

Place whole banana, as is, uncut on a baking sheet.  Place in hot oven and bake for 15 minutes or until the banana peel turns black.  That is when you know it is done!  Place on a plate and carefully split the peel with a sharp knife and eat with a spoon.

The warmth of the banana paired with a scoop of vanilla ice cream is heavenly.


Oven Roasted Bananas with Cinnamon and Chocolate

1 banana per person
a sprinkling of cinnamon
a sprinkling of chocolate chips, I used mini above, but large are just as great!
a few small pats of butter, optional

Preheat oven to 400 degrees F.

Slice banana lengthwise and place on a foil lined baking sheet.  Sprinkle with cinnamon and chocolate chips and top with a few pats of butter, if using.  Bake for 15 minutes or until banana peel turns black.  Carefully remove from oven and eat directly out of the peel with a spoon.  Enjoy as is, or serve along side ice cream, yogurt, sprinkle with granola, drizzle with honey or chocolate sauce- whatever your heart desires.  After you've had these once, trust me, you will want to try them every way possible!


Don't forget to tun in or set your DVR's to watch 
Amie, from My Retro Kitchen cooking on 
Tuesday, February 21, 2012
10:00 am


I linked up my recipe at Sweets for a Saturday!

Tuesday, November 1, 2011

Owl and Bat Cupcakes


Halloween is such a fun holiday.  I'm not so into the scary, creepy and gross side of things.  But I do love to dress up, taking the Littles out Trick or Treating and of course the fun party at my sister's afterwards.  There is always great "spooky" food (think Mac a Boney and Cheese, Ghoulash, Eyeballs- deviled eggs with olives, etc.).  This year I was incharge of dessert. Yum!


My little family all dressed up and ready to get our Trick or Treat on.
I decided to go as a 1950's Housewife, not much of a stretch, huh?!


Our Crew:
My sister the witch, her husband the Inmate, their two devilish daughters and baby Lion.  
My husband the um, OSU tailgater (er, no costume, bummer!) his 1950's housewife and our great protector Thor and his trusty lizard.  

It was super chilly so we had to bundle up.  As a kid I always hated having to cover my costume with a coat.  Still do now!  

When I was put in charge of dessert I knew I had to make these adorable owl cupcakes that have been floating around blogland.  I am not sure who thought of it "first", probably Martha Stewart.... anyways they are so easy, no intimidating ingredients (i.e. fondant) and super duper kid friendly- I mean who doesn't love Oreo's and M&Ms?!!  I also threw together a bat because right now my Jackson is obsessed with super hero's.  I thought he would get a kick out of a few of them mixed in.  And goodness was I right.  When he got home from preschool and eyed the cupcakes he points at the bat and says "Mommy, this is amazing!"  Right then and there I knew I just went up a few notches on the cool ladder....


Sure I made these for Halloween, but they would totally be cute for birthday parties (animal, woodland, super hero, etc.) as well.


Owl and Bat Cupcakes
for the cupcakes: 
1 box devils food cake (or your favorite cake mix)
3 eggs
1 1/2 cups water
1/2 cup canola or vegetable oil
18-24 cupcake liners

Prepare cupcakes according to box directions.  Allow to cool completely before decorating.

for the decorations: 
1 large package of Oreo cookies (You won't need them all, but it takes some practice to cut them.  You'll want extra)
1 bag of M&Ms (You only need the brown and the yellow, the rest is for you to snack on while baking) 1 toothpick
1 tub of your favorite chocolate frosting, homemade or store-bought
1 icing pen (I accidently bought a gel pen, but I kinda like how the details are subtle on the bats)

Smooth the chocolate frosting over the surface of the cupcakes.  Set aside.

To make the Owls:
Separate the Oreo cookies, keeping the white frosting intact.  These will be your eyes.  I found that giving them a gentle twist released them pretty well.  Have a butter knife on hand incase some frosting sticks to the opposite side.  It scraps off pretty neatly.  Then just press it back down where it goes and smooth out the crack with the knife or a finger.  Use your butter knife to very gently scrape the tops of the white frosting to remove the  brown cookie residue getting them as white as possible.  Gently press a brown M&M on the white frosting to make the iris of the eye.  If the frosting cracks a little just smooth it with your finger or the blunt edge of the knife.  If you run out of brown M&M's just use green or blue ones.  That would be cute too!  Set the eyes aside.

Now you want to cut the plain cookie tops in half to make the owls horns.  You can use a sharp knife, or what I found was that kitchen scissors worked nicely.  It is very difficult to cut the cookies in half without having one of the halves shatter.  No worries, you have a whole box right?!  (I used the imperfect ones to make the bat wings since I was trimming them up a bit with my scissors anyways.) Using your kitchen scissors, carefully clean up the edges to get the halves nice and smooth.  This was really easy to do.  I couldn't believe how will the scissors worked for this.

Now go get your cupcakes.  It is time to assemble!  I slightly smoothed out a flat section where the "eyes" were going to go to to give them a bit of support so they would sit somewhat nicely.  I thought they were going to slide off, but they surprisingly stuck rather well.  Now take two "horns".  On a slight angle, stick a point into the cupcake above-behind the eye.  Do this with both halves.  Take a little dollop of frosting and put it on the cupcake behind the horns to give them a little support so they don't fall over.  Take another little dollop of frosting and put it between the eyes below the horns to give a little "hair".  Take a toothpick and use it to make little points in the frosting creating the "hair".  Do the same thing with the toothpick over the surface of the rest of the cupcakes making them look a little fuzzy and cute.

Next take a yellow M&M, turn it up on its side and stick it in the cupcake between the eyes.  This is your beak.

Ta-da!  You just made an owl!

To make the Bats:
There are two options for the bat wings.  1)You can smooth out your cut Oreo cookie halves to make nice clean edges and sharp points like you did for the owl's horns.  2)Or you can carefully cut little points in the flat side to create the points on the bat wings.  If you don't cut the points, that is fine, just draw them in with the icing/gel pen.  If you want to go with option 1, using your kitchen scissors make small "v" shaped cuts on the flat edge of the cookie half.  I found it pretty easy to do.

Once cut, using the gel pen draw the shape of the bat wing on the decorative side of the cookie.  Carefully on an angle stick the corner of the bat wing just off center into the middle of the cupcake.  Do this again with the other side.

On the brown M&Ms, gently draw two small dots to make the eyes.  Place the "head" in between the bat wings.

And there you go- you just made a bat!


I linked up on Sweets For a Saturday #43. Come find some other delicious sweet things :)

Friday, October 28, 2011

Fridays, Feasting With Friends- Featuring Kristian Campana

"One of the delights of life is eating with friends, second to that is talking about eating. And, for an unsurpassed double whammy, there is talking about eating while you are eating with friends." ~Laurie Colwin 'Home Cooking' 

Kristian Campana

Here's the scenerio: the weekend is upon us, the weather looks promising and goodness, wouldn't it be fun to have something FUN to do?!  Well, look no further then Ohio Festivals:Exploring Ohio's Festivals one funnel cake at a time and Adventures of a Trapped 300 Pound Man: Entertaining my inner obesity through food, Ohio festivals and fun! These two blogs are really all you need to find out all that is happening throughout the beautiful state of Ohio.  To say that Kristian loves festivals would seriously be an understatement- He has taken festival hopping to a whole new level!  But wow, does he live a fun life!  Kristian travels all over the state in search of the wackiest, most delicious, and just plain entertaining festivals Ohio has to offer.  Follow along on his journey vicariously or print off the festival schedule, hop in the car and see for yourself- there is a lot of fun waiting to be had!

Oh and be sure to give your congrats to Kristian, he is a newlywed!  Last weekend, he married the love of his life, Julia and they are having the time of their lives celebrating in style on their honeymoon.  Congratulations Kristian!  I am so happy for the two of you!

Also, thank you so, so, so much for your recipe of the Mozzarepas!  Every time I go to New York City I absolutely have to get one of these things at their weekend flea markets.  They are my favorite! Serious Yum! Now I can make them myself here at home- I am super excited!  Yay!

What is your favorite thing to cook?
Medleys of any sort...it could be some concoction where I mix pork, sweet potato and apple. Or it can be an omelet filled with refrigerator leftovers. This also includes pasta sauces consisting of various ingredients (I don't make traditional red sauce) and sushi as well.

How about your least favorite thing to cook?
Fish dishes. And I love fish. But it has to be cooked just right and I get nervous about over/under cooking it.

What is your favorite local restaurant and what is one you are dying to try out?
Favorite - I absolutely love Pacific East. And since it's an hour drive from me, it's always a special treat.
A second restaurant a little closer to home would be India Garden in Lakewood.

To Try: I'd really like to try L'Albatros

Music and food go together so beautifully. You are hosting a dinner party, what would be on your playlist?
Hmm...I'd want nice melodies that didn't get too loud so that we could still talk. I think I'd go with something like Zero 7, Air, Joan as Police Woman, and Cat Power.


What would you choose to be your last meal on earth?
A fine assortment of sushi, baked scallops topped with a steamed egg custard I used to get in Columbus, raw oysters, and maybe some coconut shrimp.

For dessert, I'd be happy with a snoogle and a corner piece of cake from Kiedrowski's bakery (Amherst). Maybe even a well-frosted sugar cookie.

What are you currently reading?
Lately, I've just been reading food blogs and astrological websites. I've been getting pretty good at reading charts and figuring present aspects. Maybe I'll pick up a side job.

What is your favorite Kitchen Gadget?
Although I don't use it too often, I love the double boiler for making custards and ice cream. It has saved me a lot of unnecessary stress.

Do you have a signature go-to dish?
I make green bean salads a lot in the summertime. I'll pickle thinly sliced cucumbers before adding them for extra flavor.

I also make sushi or mozzarepas (corn pancake sandwiches filled with melted cheese) for pot lucks or parties.

What is your favorite thing about the Cleveland area?
Its history of immigration. It affects our restaurants, grocery stores and supplies tons of great ethnic festivals. It helped make me who I am.

Do you have a favorite meal from your childhood and do you cook it today?
There's a scalloped potato and ham casserole that I absolutely loved. I haven't thought about it in a long time, but it really sounds good now and it's easy to make.

Top 3 Movies of all time?
Matrix
Amelie
Tampopo

From left to right: Getting ready for the meatball eating contest at the Dean Martin Festival, Pawpaw Contest judge photo with the giant pawpaw, and the Dublin Irish Festival

What was your happiest moment in life?
There are actually a few moments that stand out:
1.) making a wish at a Japanese temple to find my soulmate
2.) learning that, before he died, a college professor got to read my letter and loved it
3.) driving down Route 2 during a fall overcast day and realizing that things were going to be OK
4.) Getting my first reply from the tons of letters I sent to Italy to find family - it changed my life forever.
5.) being with my girlfriend and family at my 100th festival last year and really feeling like I accomplished something
6.) learning that my wish in 1.) came true

I guess I'm just a happy guy!

Where do you do your grocery shopping?
I'm all over the place. Overall, I go to Giant Eagle, but I'll try to go to Marc's for cheaper produce and certain groceries and maybe Heinen's for fish and some things. If I can make it to some local farm market, then that's even better.

What is your favorite guilty pleasure when it comes to food?
I'm such a sucker for potato chips. I can't even keep them in the house.

Can you tell me about what you are most proud of?
Reconnecting my family's Italian heritage, the entire Ohio Festivals Project and the children's book I wrote and illustrated.

Do you have Culinary Resolutions that you would like to accomplish this year?
I think I would like to make grape ice cream (not sorbet). I had some in Geneva once at their Grape Festival and it was like a grape creamsicle. I loved it.

One word that best describes you is:
Effervescent
the newlyweds! 

And now can you please share one of your favorite recipes? 


Mozzarepas (or Arepas with Mozzerella cheese)
1 cup milk
5 tablespoons butter
1 cup freshly boiled corn on the cob (2 cobs)
1 1/4 finely ground yellow corn meal
1/2 cup flour
1/4 teaspoon salt
1/2 cup sugar
1 1/4 cup shredded mozzarella cheese
Mozzarella or Provolone (sliced)

After boiling 2 cobs, use knife to cut corn off and then grind in blender. You should have a nice pulp. Mix the yellow cornmeal (pass through coffee grinder to make finer if necessary), flour, sugar, salt and shredded mozzarella and mix well.  Add the corn pulp to the mixture and stir to combine well.

Bring milk to a boil as you add the butter (be careful not to burn milk).

Make a well of the mixture in the bowl and gradually add the hot milk mixture while mixing.

Get to a good pancake batter consistency. If you end up not needing to add the rest of the milk, so be it. If it's too thick, then add more milk.

Heat a lightly buttered griddle or pan and spoon batter to make small pancakes. Flip when golden brown.

you can add the cheese once it flips and then add the second pancake when done. Or you can just cook them all, make sandwiches with the cheese and nuke them in the microwave to melt the cheese.

Monday, October 24, 2011

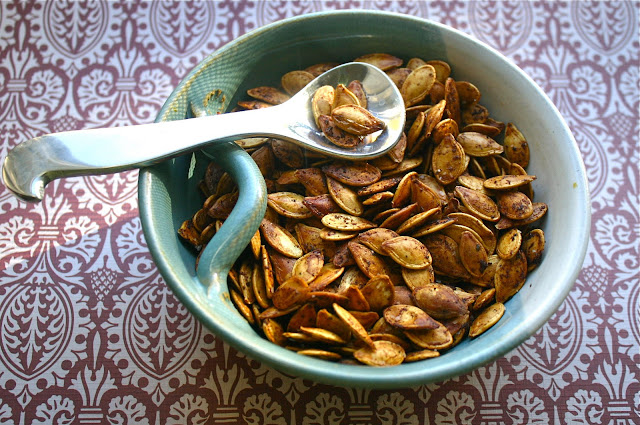
Roasted Pumpkin Seeds- Two Ways, Savory and Sweet


Roasted Pumpkin Seeds are one of my favorite snacks this time of year.  One taste makes all the work of separating seeds from the pulp completely worth it.  I have tried lots of recipes over the years, but this is probably my favorite.  A bit salty, a bit garlicky, and with just a hint of heat from the Worcestershire sauce and seriously so, so good.  They are awesome just by the handful, but also taste yummy sprinkled on soups and salads or anywhere you would like a bit of a crunch.

I have also added a nice Cinnamon Sugar version.  You soak the seeds in apple cider, bringing out the sweetness of the pumpkin flavor.  By tossing it with a buttery, cinnamon sugar topping, the heat from the oven makes the sugars caramelize, giving them an almost candy coating.  I love salty and sweet snacks together, so if you have enough seeds to make both flavors do it and serve them side by side.


Roasted Pumpkin Seeds
2 cups pumpkin seeds, cleaned and rinsed
1 1/2 tablespoons melted butter OR olive oil
1/2 teaspoon salt (I like using corse salt)
1/2 teaspoon garlic salt
1/8 teaspoon garlic powder
2 teaspoons Worcestershire Sauce
1/8 teaspoon cracked black pepper (about 20 grinds from the pepper mill)

Preheat oven to 275 degrees.

Seperate the seeds from the pulp of the pumpkin.  Don't worry about getting all of the pumpkin strands off, it adds extra flavor to the roasted seeds.  I just love when I get a seed with pumpkin still attached- yum!  You just want the seeds clean enough so you can easily toss them.  Once rinsed, lightly dry and set aside.

In a large mixing bowl, add the melted butter, Worcestershire Sauce, salt, pepper, garlic salt, and garlic powder and whisk until well blended.  Add the pumpkin seeds and toss, throughly coating in the butter mixture.  Spread pumpkin seeds in a single layer onto a silpat or parchment paper lined baking sheet.  Bake for 1 hour, checking them often and tossing occasionally, until butter topping has dried and the pumpkin seeds are golden brown.

Remove from the oven and allow to cool and dry-out the rest of the way on the cookie sheet on top of the stove.  Store in an airtight container.


Cinnamon-Sugar Apple Cider Pumpkin Seeds
2 cups pumpkin seeds, cleaned and rinsed
1 1/2 cups apple cider
1 1/2 tablespoons melted butter OR olive oil
1/8 teaspoon salt
1 tablespoon brown sugar
1 teaspoon cinnamon
1/8 teaspoon nutmeg

Preheat oven to 275 degrees.

Pour the apple cider in a medium sauce pan and bring to a boil.  Add the pumpkin seeds and boil on medium heat for 10 minutes. Drain the seeds and pour them in a large mixing bowl.

Pour the melted butter or olive oil into the bowl, along with the salt, brown sugar, cinnamon, and nutmeg.  Mix well to coat and spread pumpkin seed in a single layer onto a silpat or parchment paper lined baking sheet.  Bake for 1 hour, checking them often and tossing occasionally, until butter topping has dried and the pumpkin seeds are golden brown.

Remove from the oven and allow to cool and dry-out the rest of the way on the cookie sheet on top of the stove.  Enjoy!

Store in an air-tight container.


Saturday, October 22, 2011

Cinnamon Bun Muffins (Gluten Free, Low Carb)


I have been getting lots of requests for more Special Diet recipes (low carb, gluten free, vegan, etc.)  So this one is for you!  This recipe is low carb and gluten free due to the use of the almond meal.  The use of honey or maple syrup makes it low on the glycemic index as well, meaning that your body will break it down faster instead of storing the sugars like when using granulated white sugar does. 

But most importantly, they are SO, SO yummy!  These muffins have tons of cinnamon, making your home smell like heaven while baking.  The almond meal gives a nice nutty flavor that blends everything together beautifully.  Even if you aren't concerned about any special diets, you would still fully enjoy these muffins. Our whole family just loved them.  Thank you Comfy Belly for introducing us to this great recipe!


Cinnamon Bun Muffins (Gluten Free, Low Carb)
recipe courtesy Comfy Belly

1/2 cup of yogurt
1/4 cup of honey (or maple syrup)
2 eggs
2 1/2 cups of blanched almond flour
1/4 teaspoon of sea salt
1/2 teaspoon of baking soda

Cinnamon Topping Ingredients 
2 tablespoons of ground cinnamon
4 tablespoons of honey (or maple syrup)
2 tablespoons of unsalted butter, melted (ghee or coconut butter will work too)
1/4 cup of chopped walnuts (optional; or other nut)

Preheat oven to 310 degrees F.

Combine all the wet muffin ingredients into a bowl and blend well with a spoon. Add the dry muffin ingredients and blend well with a spoon. Place cupcake liners in a baking pan, and fill the liners halfway with batter.

Blend all the topping ingredients well. Add about a tablespoon of topping to the center of each muffin. Now put another scoop of batter on top of each muffin until the batter just about reaches the top. Add nuts now if your adding them to the top of the muffin. Evenly distribute the remaining topping over the top of each muffin. Optionally, use a toothpick to poke at the top of each muffin to allow some topping to drip into the batter.

Bake for about 25 minutes, or until a toothpick placed in the center of a muffin comes out clean and the tops are starting to brown. Cool and enjoy!

Store for a few days covered, or in the refrigerator for 2 weeks.


Don't forget to enter my 
by Avery Office Supplies for one lucky winner!  

click on the link to make your entry and to read all the details for this great prize!


I linked up on Sweets For a Saturday #43. Come find some other delicious sweet things :)

Friday, June 10, 2011

Soft and Chewy Trail Mix Cookies


What an exciting weekend this past one was!  Early Saturday morning my beautiful sister gave birth to my very first nephew!  As with many births, especially those that begin with an induction, was a very long process.  Baby Neil was just so comfy in there he wasn't sure he was ready to come out.  So all day Friday and well into the early morning on Saturday my brother in law, my parents and I waited patiently for his grand arrival at the hospital.  Lots of magazines, chit chat, fidgeting and of course bad vending machine food helped pass the time.  I tried to make a good decision, but after 10 hours of hospital lighting it was increasingly difficult.  There were these cookies by Sunmade that sounded super yummy. They were Trail Mix Cookies, crunchy little cookies full of all the great stuff you would find  in a bag of trail mix.  Although they tasted great, they were anything but healthy.  So once I got home I was determined to recreate these guys in a more healthful way.

These cookies are pretty healthy, replacing the fat with applesauce, using only egg whites and full of lots of stuff to bump up your energy level but also satisfy those mid-day cravings.  They remind me a ton of a granola bar, but the nice thing is that they are small so there isn't a big commitment that a whole bar has.  You get to eat a cookie and not feel too bad afterwards.  Nice trade off!

I think I will be playing around with the recipe, replacing some of the brown sugar with white sugar to give more of the "crunch" that I like in a cookie.  But this recipe is definitely a keeper.


print this recipe

Soft and Chewy Trail Mix Cookies
makes 3 dozen cookies
recipe adapted from allrecipes

1/2 cup applesauce
1 cup brown sugar
1 1/2 teaspoons vanilla extract
2 egg whites
1 1/4 cups all-purpose flour
1 teaspoon baking soda
1/2 teaspoon salt
3/4 teaspoon ground cinnamon
1 1/4 cups quick cooking oats
1/2 cup semisweet chocolate chips
1/2 cup white chocolate chips
1/2 cup sliced almonds
1/4 cup sunflower seeds
3/4 cup sweetened coconut
1/2 cup raisins

Preheat oven to 350 degrees F (175 degrees C). Line 2 baking sheets with silpats, parchment paper or grease with nonstick cooking spray.

Beat applesauce, brown sugar, and vanilla in a large bowl. In another bowl, use an electric mixer to beat egg whites until they are frothy and begin to firm up. Fold egg whites into applesauce mixture. Combine the flour, baking soda, salt, and cinnamon. Fold into the egg mixture. Stir in the oats, chocolate chips, almonds, sunflower seeds, coconut and raisins. Drop by heaping teaspoons on prepared baking sheets.  These cookies don't spread out at all remaining in a mound after baking.  If you would rather have a flatter cookie, press down lightly with greased finger tips.

Bake cookies in preheated oven until set and lightly browned, about 10 minutes. Remove immediately to wire racks to cool.


I linked up!


LinkWithin

Related Posts with Thumbnails