Showing posts with label Muffins and Misc. Bakery. Show all posts

Tuesday, October 14, 2014

Raspberry Almond Brown Sugar Muffins


Wow, this pregnancy was a rough one for me in regards to wanting to do anything in the kitchen.  Just the mere thought of doing any sort of cooking or baking made my stomach turn.  I would do it because well, my family had to eat.  But it wasn't the wonderful, enjoyable hobby that I have had my whole life.  And unfortunately for that my blog posts suffered as well.  I am sorry and hope that you will all welcome me back with open arms! 
 
Now that our sweet Aaron is here, my aversion to all things "kitchen" are finally gone!  Halleluiah!  Last week as a part of International Babywearing Week we went to Rosby's Berry Farm and picked the most beautiful raspberry's!  
 
 
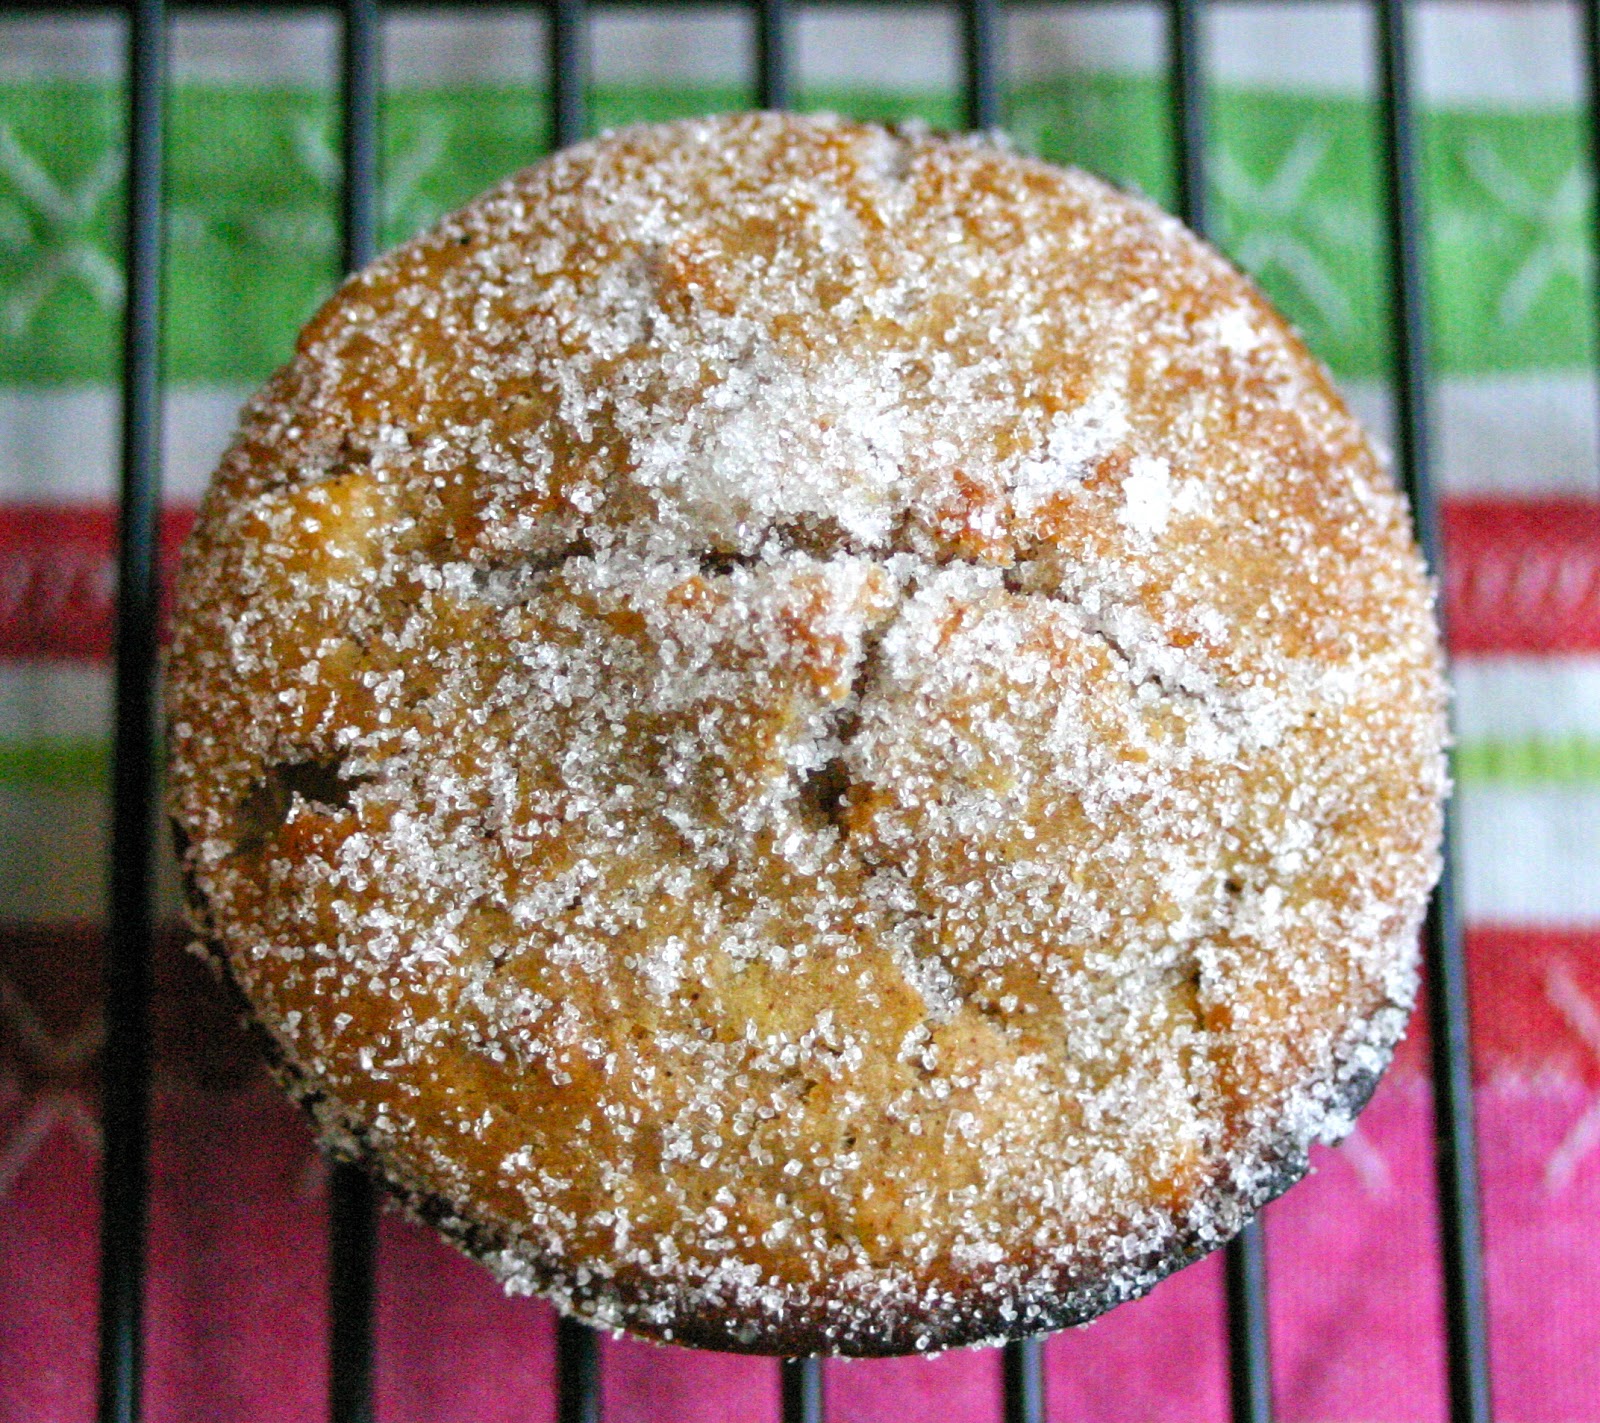
The harvest was bountiful and the berries sugary sweet.  I picked three quarts of them!   So today I celebrate with Raspberry Almond Brown Sugar Muffins.   These muffins are so amazing.  Seriously, they have the best of everything- sweet-tart raspberries and the crunch of the almonds and brown sugar topping make for the most perfect muffin. Being a nursing mom made it totally acceptable to have two this morning right?! 


Raspberry Almond Brown Sugar Muffins

2 cups all-purpose flour
1 teaspoon baking powder
1 teaspoon baking soda
1/4 cup shaved almonds
1/4 teaspoon salt
1 large egg
1 cup packed light-brown sugar
1/2 cup butter or margarine, melted
1 cup milk
2 teaspoons vanilla extract
1 cup raspberries (fresh or frozen)

Position the rack in the center of the oven and preheat to 400 degrees F. Lightly grease or line with paper baking cups (makes 12-18 muffins).

In a large bowl, blend together the flour, baking powder, baking soda, almonds, and salt.  In a medium bowl, beat the egg and brown sugar together until thick.  Beat in the butter, milk and vanilla extract.  Combine the two mixtures, blending until the dry ingredients are just moistened.  Gently stir in raspberries. 

Spoon the batter into the prepared muffin cups, filling each 3/4 full. Sprinkle the Streusel Topping (recipe follows) over the tops of the muffins.  Bake for 15-20 minutes, or until a cake tester or wooden toothpick come out clean.  Cool in the pan on a wire rack for 5-7 minutes.  Serve warm, or transfer to the rack to cool completely. 

For the Streusel Topping
1/2 cup all-purpose flour
1/4 cup brown sugar, packed
1/2 stick unsalted butter
1/2 teaspoon cinnamon

Combine all of the ingredients in a food processor and pulse until crumbly.  Alternately you can mash the ingredients with a fork.  Sprinkle over muffins immediately before baking.


Streusel Topping recipe courtesy about.com 

Tuesday, August 27, 2013

Cinnamon-and-Raisin Muffins


Hello friends!  Goodness it feels good to be back and writing.  I decided to take the summer off from blogging to spend some much needed quality time with my family.  But now with my oldest back in school and only one little guy at home with me now, I have been so antsy to get back in the swing of things.  Breaks sure can be nice, gives the perfect recharge to the soul!  And now I have a head FULL of recipes I cant wait to share with you all! 

When Jackson gets home from school he is absolutely famished. A full day of school is hard work!! Baking gives me wonderful quality time with Little O and I love having special treats at home for when Jackson gets off the school bus.  He is going to be thrilled to see one waiting for him on the kitchen table this afternoon!!


Cinnamon-and-Raisin Muffins
recipe slightly adapted from 1001 Muffins by Gregg R. Gillespie

makes 10 muffins

1 1/2 cups All-Purpose flour
2 teaspoons baking powder
1 1/2 teaspoons ground cinnamon
1/2 cup raisins
1/4 teaspoon salt
1/2 cup packed brown sugar
1 large egg
1/4 cup butter, melted
1/2 cup milk

Position the rack in the center of the oven and preheat to 375 degrees F.  Lightly grease or line with paper baking cups ten 2 3/4-inch muffin cups.

In a large bowl, blend together the flour, baking powder, cinnamon, raisins, and salt.  In a medium bowl, beat the sugar, egg, butter, and milk until smooth.  Combine the two mixtures, blending until the dry ingredients are just moistened. 

Spoon the batter into the prepared muffin cups, filling each about three-quarters full.  Bake for 15-20 minutes, or until a cake tester or wooden toothpick inserted into the center of a muffin comes out clean.  Cool in the pan on a wire rack for 5-7 minutes.  Serve warm, or invert onto the rack to cool completely. 

Delicious slathered with butter and a bit of jam!


My taste tester approves!  Owen gobbled his muffin up in no time and kept telling me how yummy they were.  Big hit!  He's pretty stinking cute too, huh?  :)

Tuesday, October 23, 2012

Fall Harvest Recipe Round-Up!

Are you on a hunt for some wonderful Autumn treats for this Hauntingly Fun Halloween Weekend?!  I have assembled for you some of my most favorites, that will definitely be a hit at any party- and especially at your own dinner table!


Roasted Pumpkin Seeds
Both a Savory and a Sweet Version!


Pumpkin Favorites
From Left to Right, Top to Bottom:
Kolokithopita- Savory Greek Pumpkin Pie
Low Carb Spiced Pumpkin Bread
Yum Yum Brownie Muffins
Caramelized Onion Pumpkin and Ricotta Tortellini's with a Walnut and Sage Brown Butter Sauce


Apple Treats 
From Left to Right, Top to Bottom:
Apple Cream Cheese Quick Bread
Apple Dapple Cake
Traditional Apple Crisp
Apple Muffins with Cinnamon Sugar


Owl and Bat Cupcakes
And just incase you are looking for some fun ways to decorate your cupcakes for the Halloween Party, these are always a huge party hit!

Wednesday, August 29, 2012

Zucchini Bread


When overloaded with zucchini, what's a person to do- bake zucchini bread of course!!

If you haven't noticed already from here, we are huge fans of quick breads.  First of all, well, they are quick! You get an almost instant gratification- stir a bunch of ingredients in a bowl, dump into pans, bake, cool and eat.  No special equipment required and they are perfect for little helpers in the kitchen because they can almost do the entire thing themselves!

This  recipe is one I borrowed from my Mother-in-law, Judy.  Every summer along with an armful of ripped zucchini's she also brings over a wonderful loaf of this delicious bread.  It never lasts long in our house!  It is so, so good!  It is lightly sweetened and studded with lots of raisins which is how we love bread in our house. We aren't big nut-in-bakery people in our house.  But of course you can go either way.  This year I asked if I could share the recipe with all of you, and you lucky people- She said yes!  Thank you Judy!


Zucchini Bread
3 cups All Purpose Flour
3 eggs
2 cups sugar
1 cup vegetable oil
1 teaspoon vanilla
2 cups grated zucchini
1 teaspoon cinnamon
1 cup nuts or raisins (optional)
1 teaspoon salt
1 teaspoon baking soda
1/4 teaspoon baking powder
1/2 cup sour cream

Preheat oven to 350 degrees F.

Grease and flour just the bottom of two loaf pans.

Sift flour into a large bowl and add all dry ingredients and set aside. In a medium sized bowl cream eggs and sugar and then add all of the wet ingredients. Add the wet ingredients to the dry and mix together well. Pour into the two prepared loaf pans.

Bake 1 hour and some minutes, (at least an hour, but the minutes will depend on your oven. Judy's cooks in exactly 1 hour while her sister's oven takes a bit longer) or until a toothpick comes out clean. Keep an eye on it.

Cool in loaf pans for 15 minutes. Turn out onto wire rack and allow to cool completely. Store in fridge or wrap well and freeze.


Monday, July 23, 2012

Blueberry Quick Bread


This weekend my sister and I gathered the troops and headed up to Vermilion, Ohio to do some blueberry picking at Baumhart Berry Farm.   Bonnie had been here once before and raved about it, so this was my first time.  What a treasure to find!  The aisles are huge, easily accommodating our two large strollers, the bushes are tall enough that you aren't bending over giving yourself a backache and most importantly, the berries are HUGE and sinfully sugar sweet!!  I couldn't get over how easy it was to pick them, just grazing your hands over the plump fruits would drop them into your bucket.  The kids never tired of the picking and our buckets soon became full.  It was a fun afternoon, and even after all our snacking we still came home with more blueberries then one knows what to do with.  Don't worry, your tummies will know exactly what to do with them!

Let me help you with this lovely Blueberry Quick Bread.  It is overflowing with blueberries in ever single bite. The the bread itself has just the right sweetness and tastes heavenly with some soft butter smeared all over it. Try it with a slice of shaved ham on top.  Super yummy!


Blueberry Quick Bread
recipe courtesy allrecipes

5 cups all-purpose flour
1 1/2 cups sugar
2 tablespoons baking powder
1 teaspoon salt
3/4 cup cold butter or margarine
1 1/2 cups chopped walnuts (optional)
4 eggs
2 cups cold milk
2 teaspoons vanilla extract
3 cups fresh or frozen blueberries
Directions

In a large bowl, combine flour, sugar, baking powder and salt. Cut in butter until mixture resembles coarse crumbs. Stir in walnuts.

In a small bowl, beat eggs, milk and vanilla; stir into dry ingredients just until moistened. Gently fold in blueberries.

Pour into two 9-in. x 5-in. x 3-in. loaf pans. Bake at 350 degrees F for 65-75 minutes or until bread tests done. Cool in pan 10 minutes before removing to a wire rack.


This recipe is featured on This and That and  http://www.foodiefriendsfriday.com Linky Party

Tuesday, April 3, 2012

Fruit Pulp Muffins


My sister has become completely into juicing.  About a month or so ago she bought a Juicer and has been having a blast making up all these amazing fruit and vegetable juices for her whole family to enjoy.  A little spinach here, carrots, cantalope, mango, watermelon, kale, apples there.... whatever you happen to pick up at the market, give it a whirl!  The skies the limit really.

I myself do not own a juicer.  I do like making up smoothies and whatnot in my blender, but that is a bit different.  With juicing, it separates the fibrous pulp from the juice, giving you just what is needed for a healthy, balanced, highly nutritious drink.  The only thing is that then you are left with all of that beautiful, full of fiber fruit pulp. You don't want to throw it out; it is also incredibly good for you.  So what to do?  There are lots of recipes out there: salsas, dips, sorbets, even your own fruit leathers.  Today Bonnie wanted to share with you all a recipe for Fruit Pulp Muffins.  So if you happen to have a juicer or know someone who does- try these out! They taste amazing!!!


Create Your Own Juice Pulp Muffins
recipe courtesy All About Juicing!

Use any combination of fruit pulp you have on hand to make your own muffins. You really can't go wrong!

4 cups of any fruit pulp
1 cup of sesame or olive oil
3 eggs
1 cup of honey
3 cups of whole grain flour
1 tbsp baking soda
1 tsp of nutmeg, cinnamon or spice of choice(optional)
1 tsp of vanilla


Mix the fruit pulp with the honey, eggs, vanilla, oil and mix. Add the dry ingredients. Pour into muffin cups or greased muffin tins. Bake for 45 minutes at 350 degrees.


Saturday, January 7, 2012

Whole Wheat Flour Tortillas


This was one of those things that every single time we had soft tacos or flour enchiladas I would think to myself "Hey, I bet I could make these".  Well last night I finally did!  And seriously, listen to me- never go out and buy them again!  This recipe couldn't be any more simple.  It is made with whole wheat which I love and no lard like in so many other recipes, making them much healthier than most store-bought versions.  The taste is light and nicely flavorful, and we all hands-down agreed that we never, ever should eat the store bought kind again.

We had a few left over so I wrapped them in foil and put them in a large re-sealable bag in the fridge.  I was a little nervous that the moisture of the fridge would turn them gummy, but the next day they were even more amazing- if you can believe that!  I tried both reheating them in the microwave sandwiched between damp paper towels and than also wrapped in foil and placed in a warm (200 degree) oven for 5 minutes.  Both ways provided delicious, pliable, rollable flour tortillas!  So not only are they great made to order, but also made ahead of time and just reheated for company the next day.

A friend told me that she heard flour tortillas were very difficult to roll out into circles.  I really didn't have much trouble.  They aren't prefect circles as you can see.  But close enough!  Honestly, I don't really like my homemade goods to look too "perfect".  I like the imperfections that tell you they were made with love at home instead of mass-produced from a store.  And I am sure that practice makes "almost" perfect, and I know that I will be making these many, many, many more times in the future.


Whole Wheat Flour Tortillas
recipe courtesy The Everything Bread Cookbook

yields 6-8 tortillas

1 cup whole wheat flour
1 cup all purpose flour
1/2 teaspoon salt
2 Tablespoons vegetable oil
1/2-3/4 cup cold water

In a large bowl, combine flours and salt.  Stir in oil, and enough water to hold dough together.  Knead until smooth, about 2-3 minutes, then let it rest for 5 minutes.

Turn dough out onto a floured work surface.  pinch off golf-ball-sized pieces of dough and roll into balls.  With floured fingers, flatten into thin disks.  Using a rolling pin, roll out disks no more than 1/4" thick.  If the dough becomes elastic and springs out of shape, allow to rest for 5 minutes, then roll again as necessary.

Preheat griddle over heat.  Cook until lightly goldne but still pliable, about 1-2 minutes per side.  Serve warm.

Don't they look so yummy?!  Why don't you go and make some tonight?

Friday, January 6, 2012

Apple Cream Cheese Quick Bread


Do you love cheese danishes as much as we do?!  If so, then you will LOVE this recipe! It is a quick bread (think simple and easy!) But has all the amazing flavors of a cheese danish, minus the extra work involved. And with the addition of grated apples you get the tangy sweetness of the fruit as well.

I made a loaf last night and already over half of our bread is gone! Jackson can't keep his little hands out of it. Last night while I was slicing, he kept sneaking little bites and this morning he says to me "Mommy, can I have a piece of your bread now and another piece at breakfast? I love it!" Now, mind you this was just at 7:30am while I was in the middle of scrambling his egg for breakfast.  I guess it is a winner! We even bought more apples today to make more this weekend. Yeah, it's that good.

Just be sure to grease and flour your pans really, really well. As you will see in the pictures, parts of my crust stuck to the pan.  Jackson told me that it was ok, he would just eat those good bitzky bites for me that stuck. Good thing I don't have finicky eaters in this house :)  I apologize for the not so beautiful pictures, but you get the point.  We were all too much in a hurry to eat!


Apple Cream Cheese Bread
recipe courtesy of Tomato Kumato

for the apple cake
2 apples
1/2 cup vegetable oil
1 cup sugar
2 eggs
1 tsp. vanilla
1 1/3 cup flour
1 tsp. baking soda
1/2 tsp. salt
1 tsp. cinnamon
1 pinch nutmeg

for the cream cheese swirled topping
6 oz. cream cheese
1/2 cup sugar
1 egg

Preheat oven to 350 degrees F.

Grate the apples (skin and all) into a large mixing bowl. Add the oil, cup of sugar, eggs and vanilla and mix well to combine. Without mixing, add the flour, baking soda, salt, cinnamon and nutmeg. Carefully fold the dry ingredients into the wet, and pour into the prepared loaf pan.

Combine the cream cheese, sugar and egg with a fork. Pour over the top of the batter, and use a knife to swirl the two layers together.

Bake loosely covered with foil for 30 minutes. Then remove the foil and continue to bake an additional 15-20 minutes (mine took at least 20 additional minutes, and I have an oven that runs hot), until a toothpick inserted into the cake comes out clean with a few crumbs attached. Allow to cool fully before slicing.  This is very important.  I know it will be tempting to cut into it right away, but the bread needs to set up some, otherwise it will fall apart if sliced too soon.


Here is close-up of all that wonderful swirly goodness.  Caramelized sugar, cinnamon, sweetened cream cheese, bits of apple......

Wednesday, November 23, 2011

One Fish Two Fish Cupcakes


This past Saturday we celebrated my (not-so baby) boys 1st birthday party.  And oh my, what fun it was!! There was lots of great food provided by everyone, wonderful company and LOTS of laughs!  We sure have some silly kids (and adults!) in this family!  Owen got into the full spirit of things and completely smashed his smash cake.  It was unbelievable how excited and into it he got!  When Jackson turned one, we had to take his hand and smash it into his cake for him- NOT OWEN!  The moment it was put onto his tray his hand went right in it and it was craziness from then on!  He knew exactly what to do and HE. WAS. A. MESS!  But boy, did he have fun.  And so did we- it is just what you want your one year old to do with a smash cake, it was hilarious.


When coming up with decorations, what originally started out as just a "fishy" themed birthday slowly morphed into a Dr. Seuss Birthday Party.  I wanted to keep the cost down and realized we owned tons of books that would work awesome as decorations- they are colorful, silly and encouraged people to pick them up and read.


I used some of my drawing skills and hand drew the rest of the pictures to hang around the house.  What resulted was a party that was super inexpensive and such fun!  Perfect for our joyful Owen.


After the fun I had decorating my owl and bat cupcakes for Halloween, I knew I wanted to do another fun cupcake for Owen's party.  Since I was focusing on the decorating, I made things easy on myself and just used a boxed yellow cake for the cupcake's.  If you happen to have a great cupcake recipe, please send it my way! But this worked great for me, and everyone seemed to enjoy them.  For the first time I used a soft gel paste food coloring to dye my frosting. It was a recommendation of my cake lady down the street, and she was right!  This stuff is awesome.  It only took a little bit to achieve such a great blue color (and it didn't dye peoples lips and tongue!)  After mixing the food coloring into the frosting, I spooned it into a gallon-sized ziplock bag and snipped the tip.  This worked perfect as my pastry bag since I don't own one of those fancy things.


Starting on the outside edge of the (completely cooled) cupcakes, I slowly piped the icing in a circular motion, working my way to the center.  I wanted to achieve a sort of "water and wave" appearance, so I wasn't concerned about the pipping to look perfectly even.  Then I sprinkled them lightly with blue sugar crystals and placed different colored goldfish crackers jumping in and out of the "waves".  Next I added white pearl candies to create the look of the fishes air bubbles.  And there you have it, One Fish Two Fish Cupcakes :)  Pretty fun if you ask me!

I knew they would look cute- but at first I wasn't sure how the goldfish crackers would taste on top of the cupcakes, but they were actually delicious together!  They gave a nice crunch, texture is always a good thing, and also a very light salt flavor to the already sweet cupcakes.  It made a nice combo.


One Fish Two Fish Cupcakes
makes 24 traditional-sized cupcakes (or 12 trad. and 24 mini, or 48 mini)

1 box yellow cake mix (or a batch of your favorite yellow cake), prepare as directed for cupcakes
24 large cupcake liners (I used 12 large and 24 mini)
1 tub white frosting (or a batch of your favorite white frosting)
blue food coloring, I highly recommend AmeriColor
1 bag of mini goldfish crackers
blue sugar crystals
mini pearl candies (look in your local cake supply store)

Prepare cupcake batter as directed on the back of the box, filling the cupcake liners 3/4 the way full.  Bake at 350 degrees for 15-18 minutes, or until a toothpick inserted in the center comes out clean.  Please note, mini cupcakes will take a much shorter amount of time, so please keep watch!  Remove from cupcake pan and allow to cool COMPLETELY on a wire rack before frosting them.

While you are waiting for the cupcakes to cool, dye frosting by adding a few drops of food coloring at a time until you get the desired color.  Mix well.  Spoon frosting into a pastry bag, or a gallon-sized ziplock bag and snip the end.  Carefully push all the frosting down to the snipped end of the bag to create a nice tube of frosting.  Once the cupcakes are cool, gently and slowly squeeze the frosting out of the bag onto the cupcakes in a circular motion, working from the outside in creating little peaks of frosting.

Next lightly sprinkle the cupcakes with the blue sugar crystals, place the goldfish crackers in the "waves" you just created in the blue frosting and then in a zig-zag pattern arrange the white pearled candies to create the air bubbles.

And there you have it- Fish Cupcakes!


I linked up on Sweets for a Saturday #45!

Saturday, October 22, 2011

Cinnamon Bun Muffins (Gluten Free, Low Carb)


I have been getting lots of requests for more Special Diet recipes (low carb, gluten free, vegan, etc.)  So this one is for you!  This recipe is low carb and gluten free due to the use of the almond meal.  The use of honey or maple syrup makes it low on the glycemic index as well, meaning that your body will break it down faster instead of storing the sugars like when using granulated white sugar does. 

But most importantly, they are SO, SO yummy!  These muffins have tons of cinnamon, making your home smell like heaven while baking.  The almond meal gives a nice nutty flavor that blends everything together beautifully.  Even if you aren't concerned about any special diets, you would still fully enjoy these muffins. Our whole family just loved them.  Thank you Comfy Belly for introducing us to this great recipe!


Cinnamon Bun Muffins (Gluten Free, Low Carb)
recipe courtesy Comfy Belly

1/2 cup of yogurt
1/4 cup of honey (or maple syrup)
2 eggs
2 1/2 cups of blanched almond flour
1/4 teaspoon of sea salt
1/2 teaspoon of baking soda

Cinnamon Topping Ingredients 
2 tablespoons of ground cinnamon
4 tablespoons of honey (or maple syrup)
2 tablespoons of unsalted butter, melted (ghee or coconut butter will work too)
1/4 cup of chopped walnuts (optional; or other nut)

Preheat oven to 310 degrees F.

Combine all the wet muffin ingredients into a bowl and blend well with a spoon. Add the dry muffin ingredients and blend well with a spoon. Place cupcake liners in a baking pan, and fill the liners halfway with batter.

Blend all the topping ingredients well. Add about a tablespoon of topping to the center of each muffin. Now put another scoop of batter on top of each muffin until the batter just about reaches the top. Add nuts now if your adding them to the top of the muffin. Evenly distribute the remaining topping over the top of each muffin. Optionally, use a toothpick to poke at the top of each muffin to allow some topping to drip into the batter.

Bake for about 25 minutes, or until a toothpick placed in the center of a muffin comes out clean and the tops are starting to brown. Cool and enjoy!

Store for a few days covered, or in the refrigerator for 2 weeks.


Don't forget to enter my 
by Avery Office Supplies for one lucky winner!  

click on the link to make your entry and to read all the details for this great prize!


I linked up on Sweets For a Saturday #43. Come find some other delicious sweet things :)

Wednesday, July 27, 2011

Egg Muffins


So I am tired of the last few pregnancy pounds hanging onto my body for dear life.  Enough is enough already! I lost so much of the weight so quickly and it was awesome.  But now I am hovering at a plateau for the last few months and it is time to shake it!  I need something to boost up my metabolism and get everything moving so we have decided to start up South Beach Diet.  Not really all that thrilled about "dieting" but I have done low-carb a few times before and it really works quickly.  The nice thing with South Beach is that you don't need to stay altogether low carb past the first two weeks.  *phew*  I know many people that have had a lot of success with the diet, including my parents, so I am excited to see some positive changes in myself as well.  Wish me luck and I will share some of our favorites recipes along the way too.

There is an awesome blog, Kalyn's Kitchen, that is primarily all South Beach Friendly recipes.  You don't need to be on the diet to be able to appreciate her recipes.  Seriously, everyone could pretty much benefit by reduced carbs and increasing vegetables, whole grains and lean meats!  

After sleeping for 6-10 hours a night your body needs a serious recharge.  You need to break the fast that your body was doing while your were snoring away.  Hence the name breakfast.  These Egg Muffins are a wonderful start to your day.  Once you make a full batch you then have a quick breakfast for the rest of the week.  They have no flour, making pretty much carb free but also gluten free and high in protein.  Oh, and did I mention yummy?!


Egg Muffins
recipe slightly adapted from Kalyn's Kitchen

12 Eggs
1/2 cup low fat 2% cottage cheese
1 (4 oz) can chopped green chili's
3 green onions, chopped
1-2 cups grated low-fat cheese (I used sharp cheddar, but any of your favorites will work great!)
1/2 teaspoon salt
1/2 teaspoon freshly ground black pepper
Optional: chopped veggies such as blanched broccoli, red pepper, zucchini, mushrooms, etc. (Using veggies will reduce the fat content)
Optional: diced Canadian bacon, lean ham, or crumbled cooked turkey sausage

Preheat oven to 375 F. Use regular or silicone muffin pan, 12 muffin size. If using silicone pan, spray with nonstick spray. If using regular muffin pan, put two paper liners into each slot, then spray liner with nonstick spray.

In the bottom of the muffin cups layer diced meat, if using, vegetables, if using, cheese and green onions. You want the muffin cups to be about 2/3 full, with just enough room to pour a little egg around the other ingredients. Break eggs into large measuring bowl with pour spout.  Add the cottage cheese, salt and pepper, and beat well. Pour egg into each muffin cup until it is 3/4 full. I like to stir slightly with a fork. Bake 25-35 minutes until muffins have risen and are slightly browned and set.

Muffins will keep at least a week in the refrigerator without freezing. Egg muffins can be frozen and reheated. For best results, thaw in refrigerator before reheating. Microwave on high about 2 minutes to reheat.

Thursday, May 5, 2011

Apple Muffins with Cinnamon and Sugar

These muffins are wonderfully light, and despite the sugar topping, they are the perfect sweetness.  Not too sweet- just right.  You will love these.  I promise.  


Apple Muffins with Cinnamon and Sugar
makes 6 3-inch muffins or 24 mini muffins

3/4 Cup all-purpose flour
1 cup whole wheat flour
2 tablespoons granulated sugar, plus more for sugarcoating the muffins
2 teaspoons baking powder
1/2 teaspoon salt
1 1/4 teaspoons ground cinnamon
1/2 teaspoon ground nutmeg
1 large egg
1 cup skim milk
6 tablespoons canola oil
1/2 cup frozen apple-juice concentrate, thawed
1/4 teaspoon lemon extract
1 large apple, peeled, cored and finely chopped

Position rack in the center of oven and preheat to 400 degrees F.  Lightly grease or line with paper baking cups six 3-inch muffin cups.

In a large bowl, blend together the two flours, 2 tablespoons sugar, baking powder, salt, cinnamon, and nutmeg.  In a medium bowl, beat the egg, milk, oil, apple juice, and lemon extract until smooth.  Stir in the apples.  Combine the two mixtures, blending until the dry ingredients are just moistened.

Spoon the batter into the prepared muffin cups, filling each about 3/4 full.  Bake for 20-25 minutes, or until the tops are golden and a cake tester or wooden toothpick inserted into the center of a muffin comes out clean. Cool in the pan on a wire rack for 5-7 minutes.

Serve warm, or invert onto the rack to cool completely.  While still warm, coat the muffins with sugar.


I doubled the recipe and made a batch of mini muffins as well as regular sized. I LOVE the mini muffins! These are the perfect flavors for a little bite-sized treat. I definitely recommend making them tiny like this. Isn't anything more fun when they are small?  Plus, this way you can have more then one and not feel guilty....


Sunday, April 10, 2011

Mini German Pancakes


Have you ever heard of these things? I hadn't until just recently.  I was playing on www.stumbleupon.com and a website popped up with these amazing creations.  I was immediately intrigued.  So off to google I ran for a bit of research.  German Pancakes, Dutch Babies, Pop-Up Pancakes, Hootenannies, High-Rise Pancakes, Pfannekuchen... so many names for such a neat dish.  It only took a few pictures and a little browsing of recipes for me to know I just HAD to make these things!  They pop up crazy huge while they are baking, puffing and rising in all wild directions. They are a hoot to watch baking; I got just as much of a kick watching them as my four year old did.


The traditional way of making them is in a large 9x13 cake pan or a jelly roll pan.  But a few recipes showed making them in muffin cups for individual little popover-like "pancakes".  Since I have a Little Man that LOVES muffins and pancakes, I thought this would be a fun way to make breakfast for him.  Well I gotta tell you- I don't think I could ever eat a regular pancake again.  These are way too good! You can't help but love these guys just looking at them.  German Pancakes rise looking very Soufflé-like.  But the taste and texture is quite different.  They are flakey and lightly crisp on the outside, but very creamy and custardy on the inside. They sort of reminding me of the flavor of a crepe. They are unique, and OH SO FUN!


Just blending 5 ingredients, it honestly couldn't be simpler.  Instead of carefully pouring your batter onto a hot skillet into perfect disks, watching them closely making sure they don't burn, flip, do all over again.... etc. etc. With these, just pour the batter into very well greased muffin pans, bake for 15 minutes and then enjoy!  I can easily see these becoming a Saturday morning tradition.  

The traditional way of serving them is with freshly squeezed lemons and powdered sugar.  Since I didn't have either, we went with fresh bananas, pure maple syrup and mini chocolate chips.  I also had one with bananas and a sprinkling of cinnamon.  Both were pure bliss.  I am also picturing a warm strawberry syrup, or cinnamon sugar apples would be beautiful toppings.  Or Nutella.... Mmmmm.  Well, the only way around this dilemma is making them again.  And again.  And again.....


Mini German Pancakes
1 cup milk
1 cup flour
1/4 cup melted butter
6 eggs
pinch of salt

Preheat oven to 400 degrees. Combine all ingredients in a blender (you can also use a whisk or a hand mixer) and mix until completely smooth and liquified. Pour into very well greased muffin cups (or one 9x13 pan) and bake for 15 minutes or until golden brown and very well puffed. They will deflate some after being removed from the oven, creating little "cups". Top with add-ons of your choice and enjoy.

Print this Recipe

check out that lovely, creamy center!

LinkWithin

Related Posts with Thumbnails